Introduction

Thank you for purchasing Conrise - Elementor WooCommerce Theme!

In this document, you will find information on how to install, manage, and update your theme, as well as create content, install plugins, import demo data, and more. If you have any questions that are beyond the scope of this help file, please feel free to contact us via the support link. We will do our best to respond as quickly as possible.

Note: All images used in the demo are for preview purposes only and are not included in the final theme purchase package.

Need Support?

We are always happy to help and value our customers. All our theme packages include a user manual tailored for each product. These help files are located inside your download package.

Support for our items includes:
  • Responding to questions or problems regarding the item and its features
  • Fixing bugs and reported issues
  • Providing updates to ensure compatibility with new software versions
Item support does not include:
  • Customization and installation services
  • Support for third-party software and plugins

Support hours: Monday to Friday, 8:00 to 20:00 (GMT +5:30). We usually reply within 24 hours. Support requests sent on weekends or holidays will be handled on the next business day.

If you have any questions regarding theme issues, please send us a support request here.

Need Installation or Customization Services?

If you need help with installation, website/theme customization or development, adding specific functionality, back-end or front-end custom work, theme/plugin updates, testing, or bug fixing — please send us a request HERE with your requirements. Our expert technical team will assist you for an additional fee.

WordPress Information

Prepare Your WordPress Site

To install this theme, you must have a working version of WordPress already installed. If you need help installing WordPress, follow the official instructions provided in the WordPress Codex. Below are some useful links to help you get started with WordPress.

Recommended PHP Configuration Limits

Server Requirements for Conrise Theme

Many issues such as white screens, demo import failures, empty page content, max execution time errors, memory limit errors, and upload file size issues are related to low PHP configuration limits. To ensure optimal performance and avoid such problems, we recommend setting the following PHP values. You can update these settings yourself or contact your hosting provider for assistance.

  • max_execution_time = 600
  • memory_limit = 256M
  • post_max_size = 32M
  • upload_max_filesize = 32M
  • max_input_time = 300

Theme Installation

Install Your Theme with Ease

After you download the package from ThemeForest, please unzip it. You'll see a file called conrise.zip, which is the main file needed to upload and install the theme.

The theme files can be uploaded in two ways:

  1. Install via WordPress
    1. Login to your WordPress Dashboard.
    2. Navigate to Appearance > Themes.
    3. Click the Add New button at the top of the page.
      Theme Installation
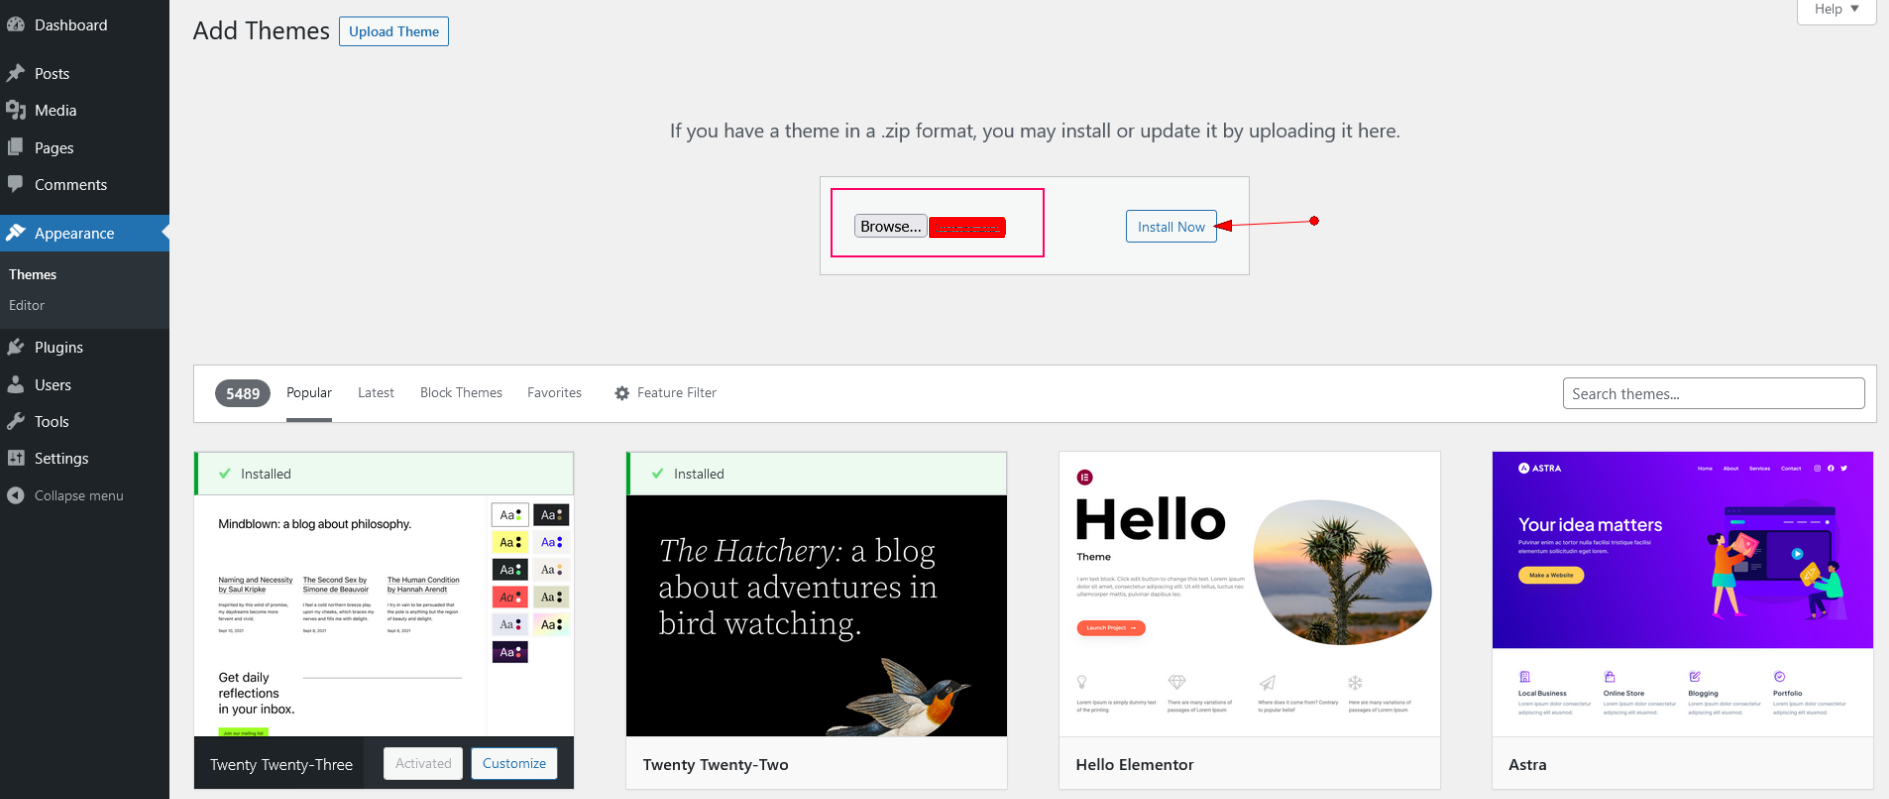
    4. Click the Upload Theme button.
      Theme Installation
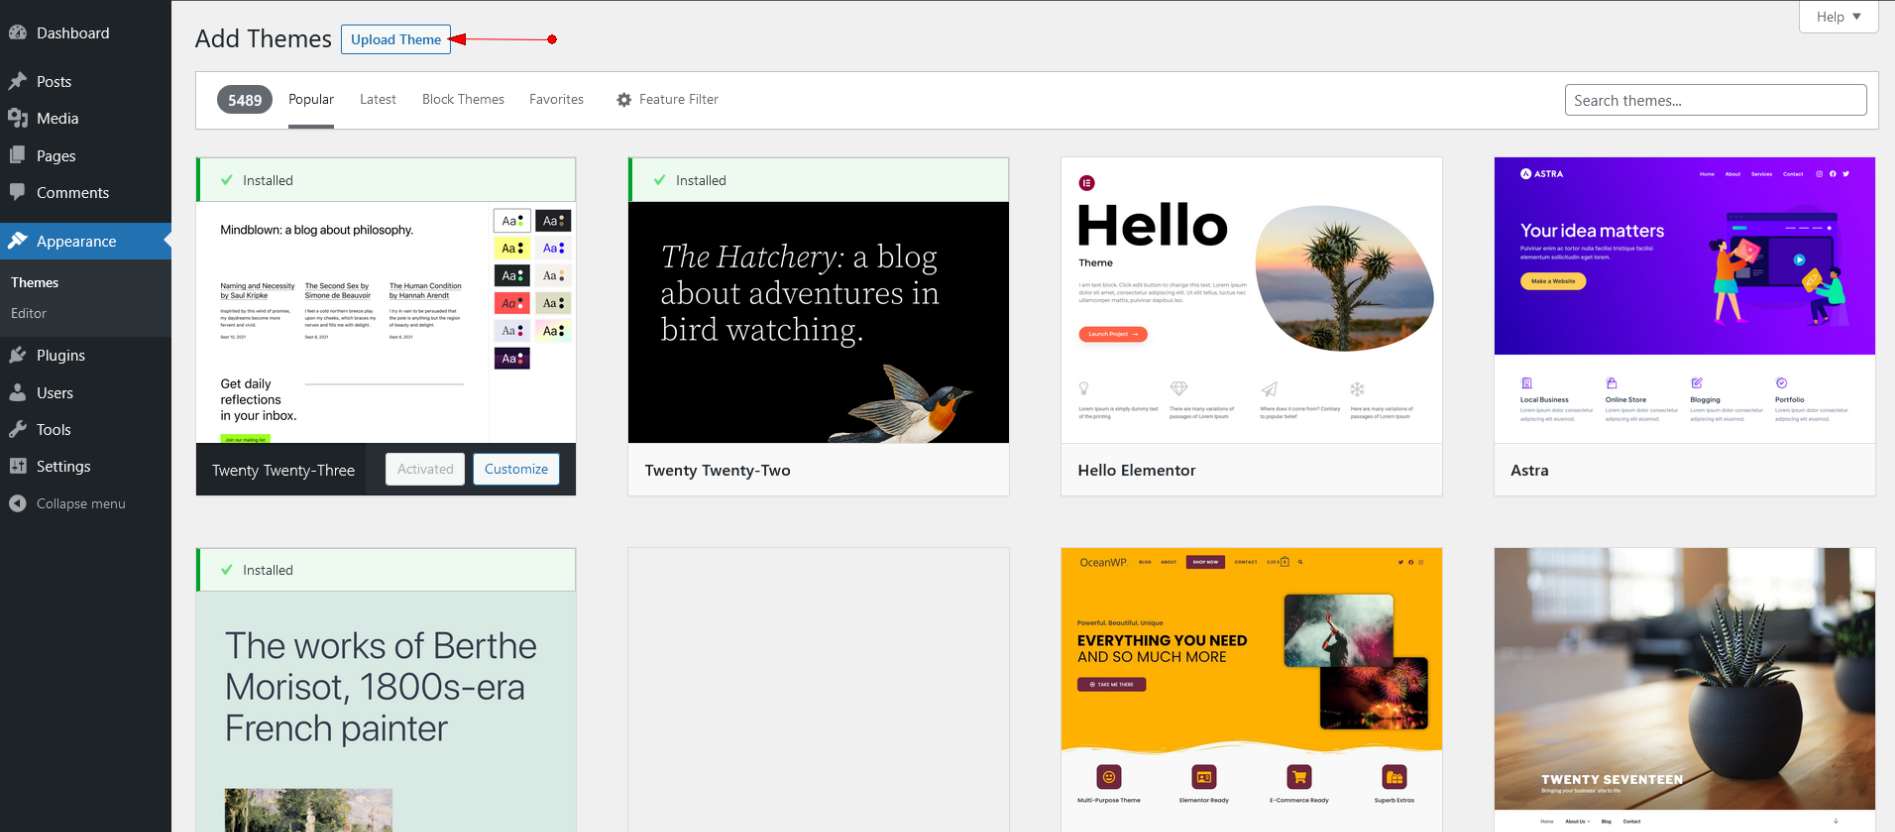
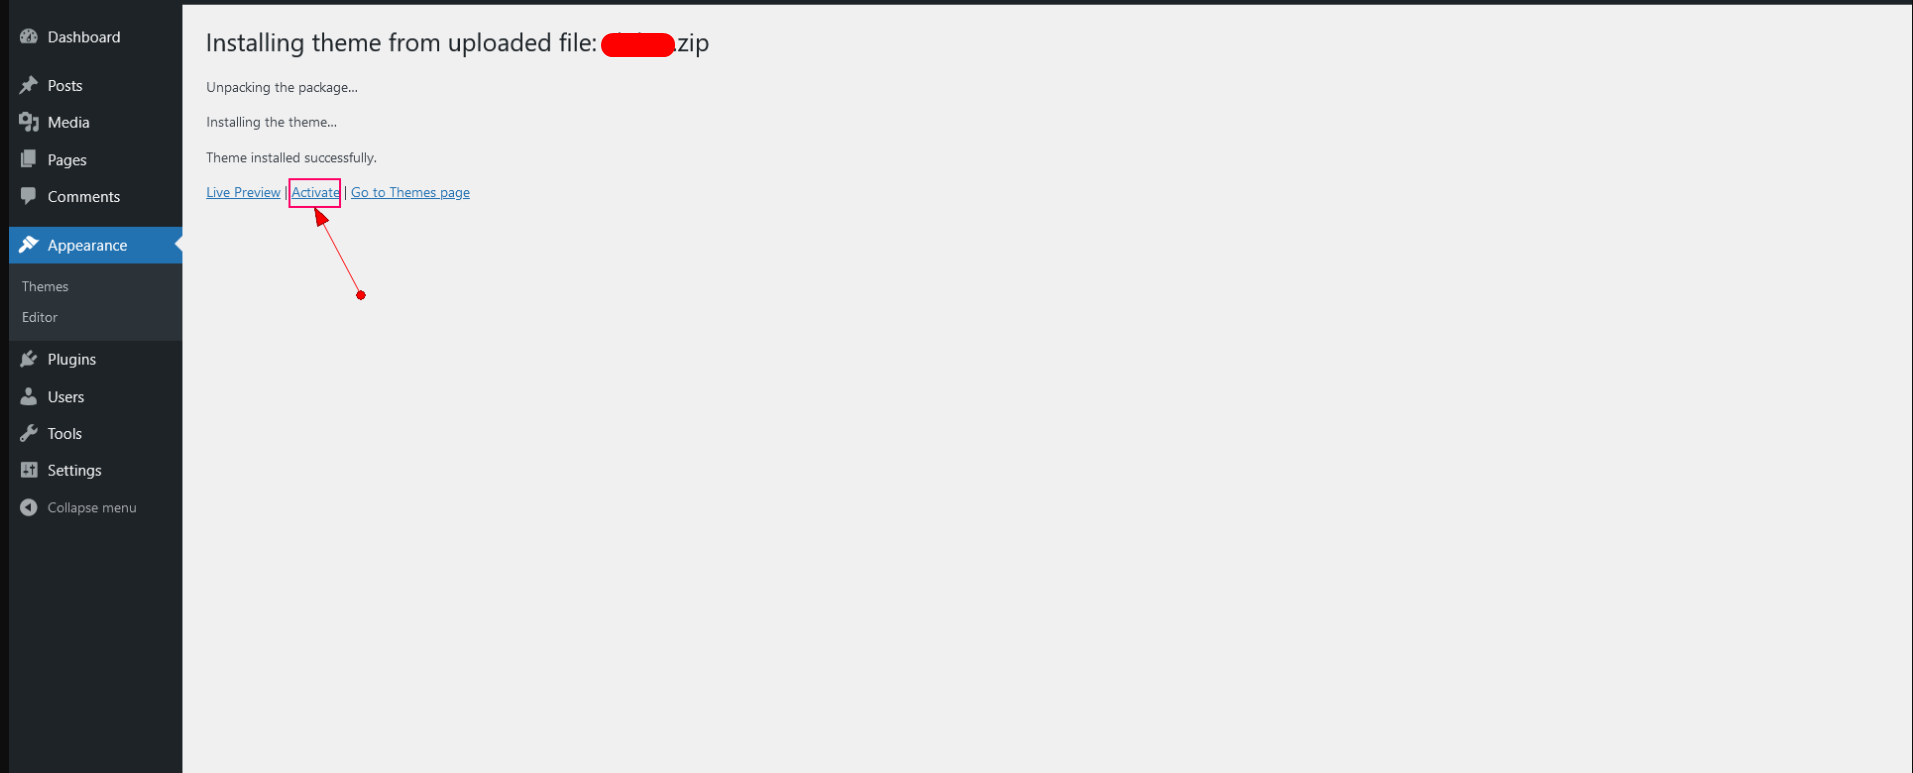
    5. Browse to the conrise.zip file and click Install Now to upload and install the theme.
      Theme Installation
    6. After installation, click Activate the theme.
      Theme Installation
  2. Install via FTP
    1. Using an FTP client (like FileZilla), connect to your server/hosting and navigate to your WordPress installation.
    2. Navigate to the /wp-content/themes/ folder and upload the unzipped theme folder (extracted from conrise.zip).
    3. Log in to your WordPress Admin Dashboard and go to Appearance > Themes.
    4. You will see Kidsa listed among the other themes. Simply activate it.

Install Required Plugins

Activate Essential Plugins for Conrise

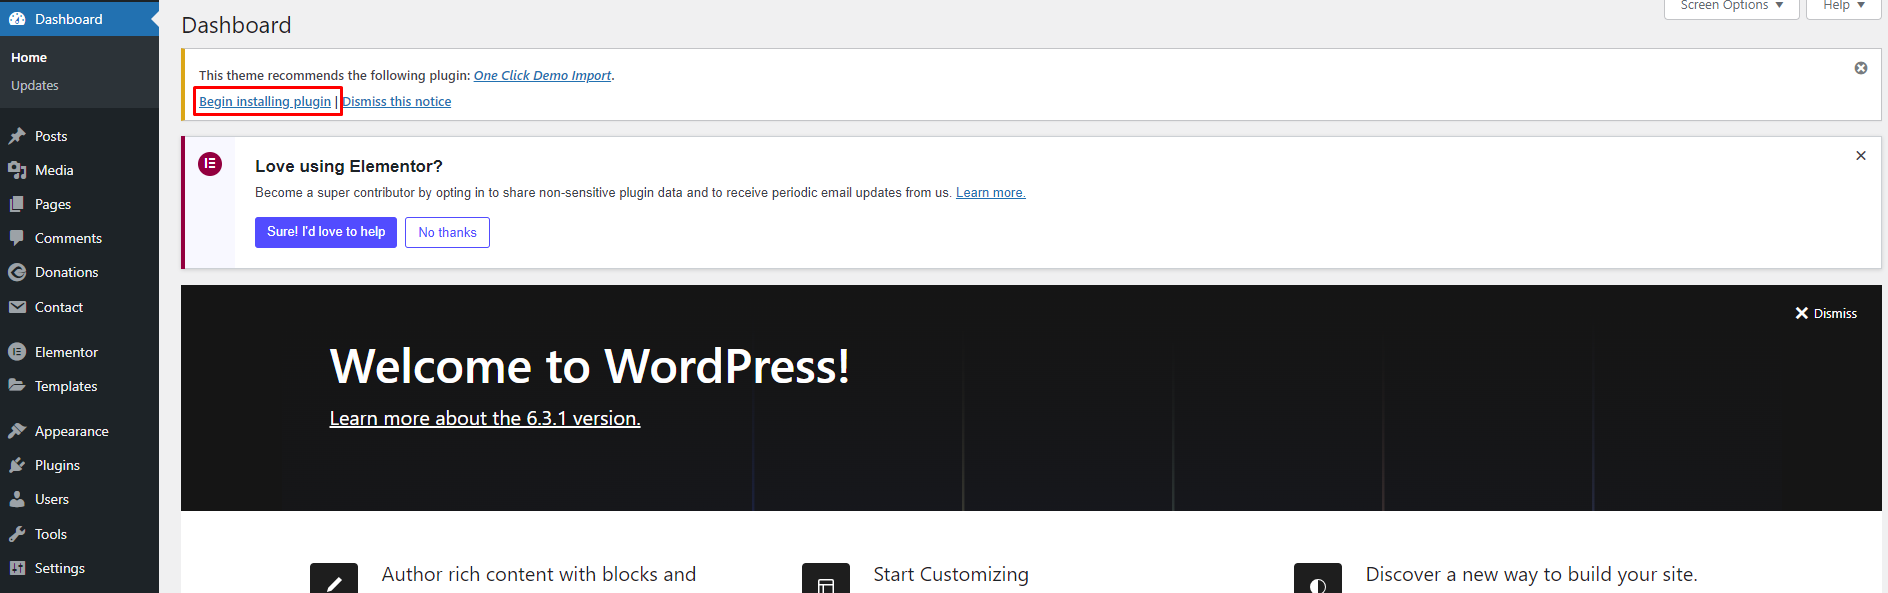
After installing and activating the Conrise theme, you'll see a notification at the top of the page that says the theme needs some plugins to function properly. Please follow the steps below to install the required plugins:

  1. Click on the Begin installing plugins link or go to Appearance > Install Plugins.
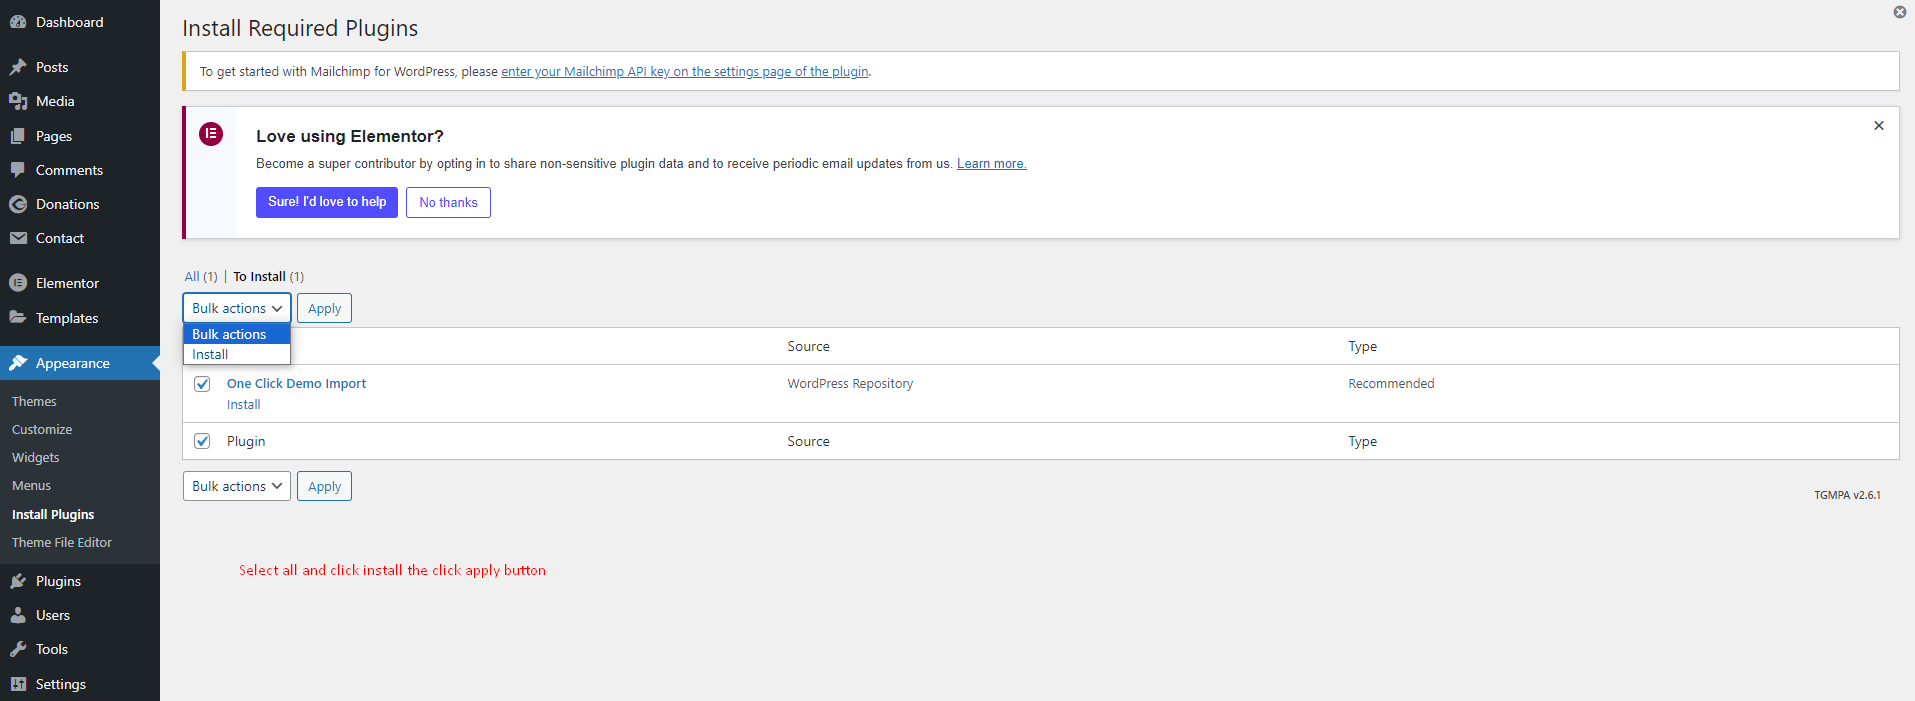
  2. Select all plugins that you wish to install (selecting all of them is recommended).
    Install Plugins
  3. Change the Bulk Actions dropdown to Install and click Apply to install the selected plugins.
    Install Plugins
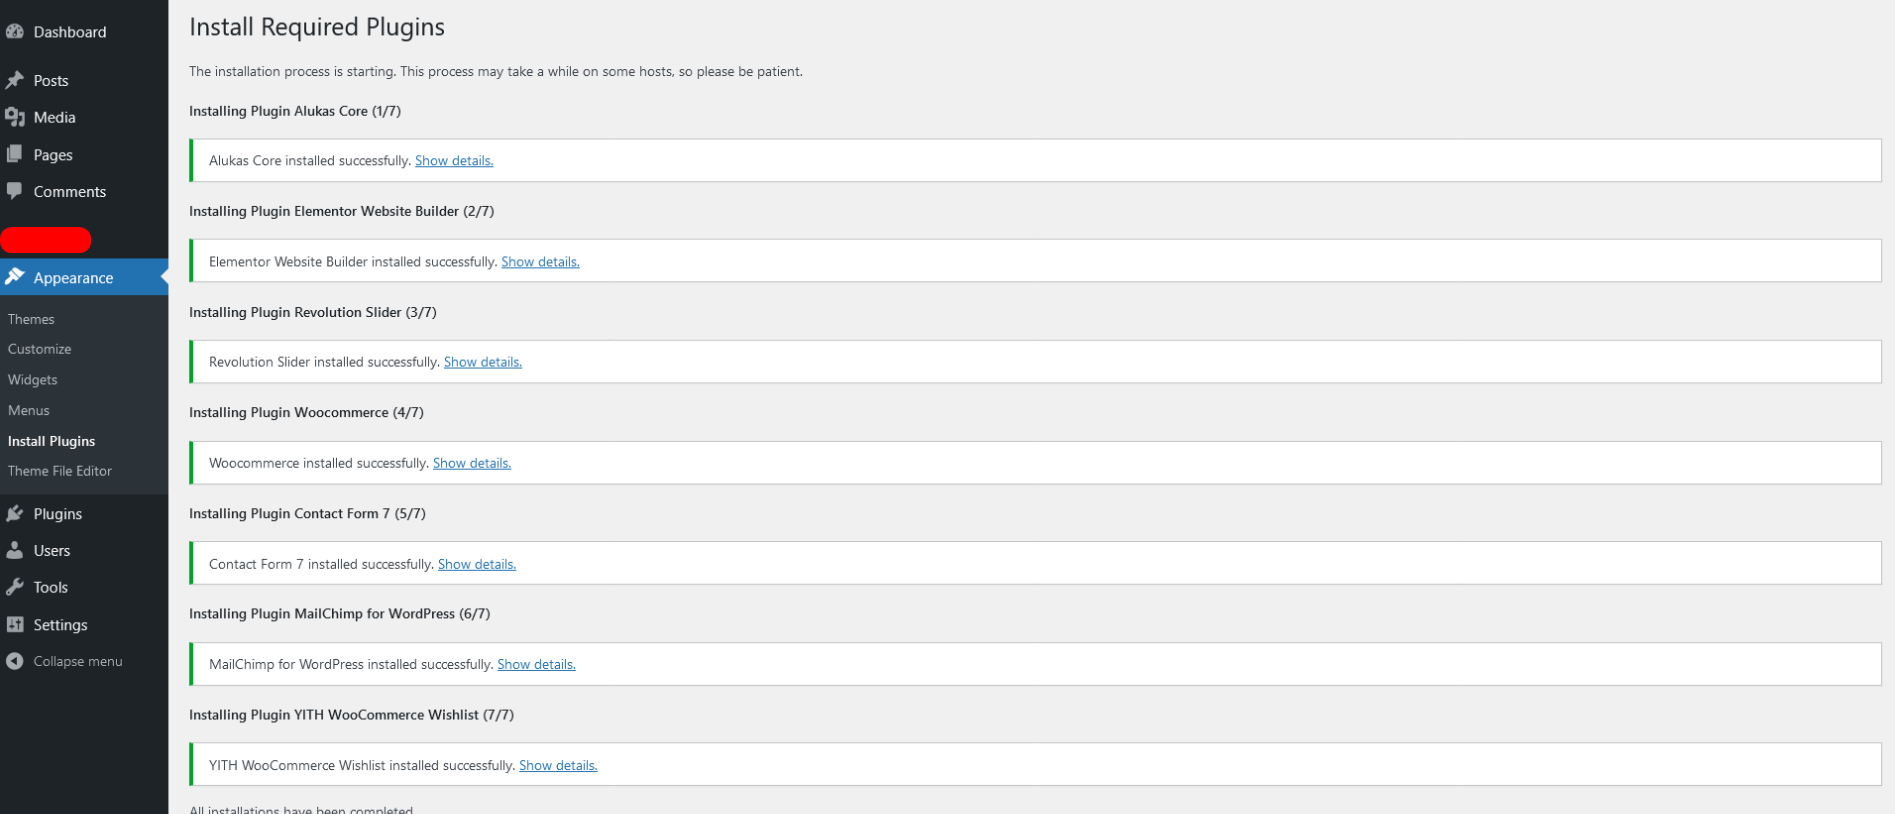
  4. After all plugins are installed, click the Return to Required Plugins Installer link.
    Install Plugins
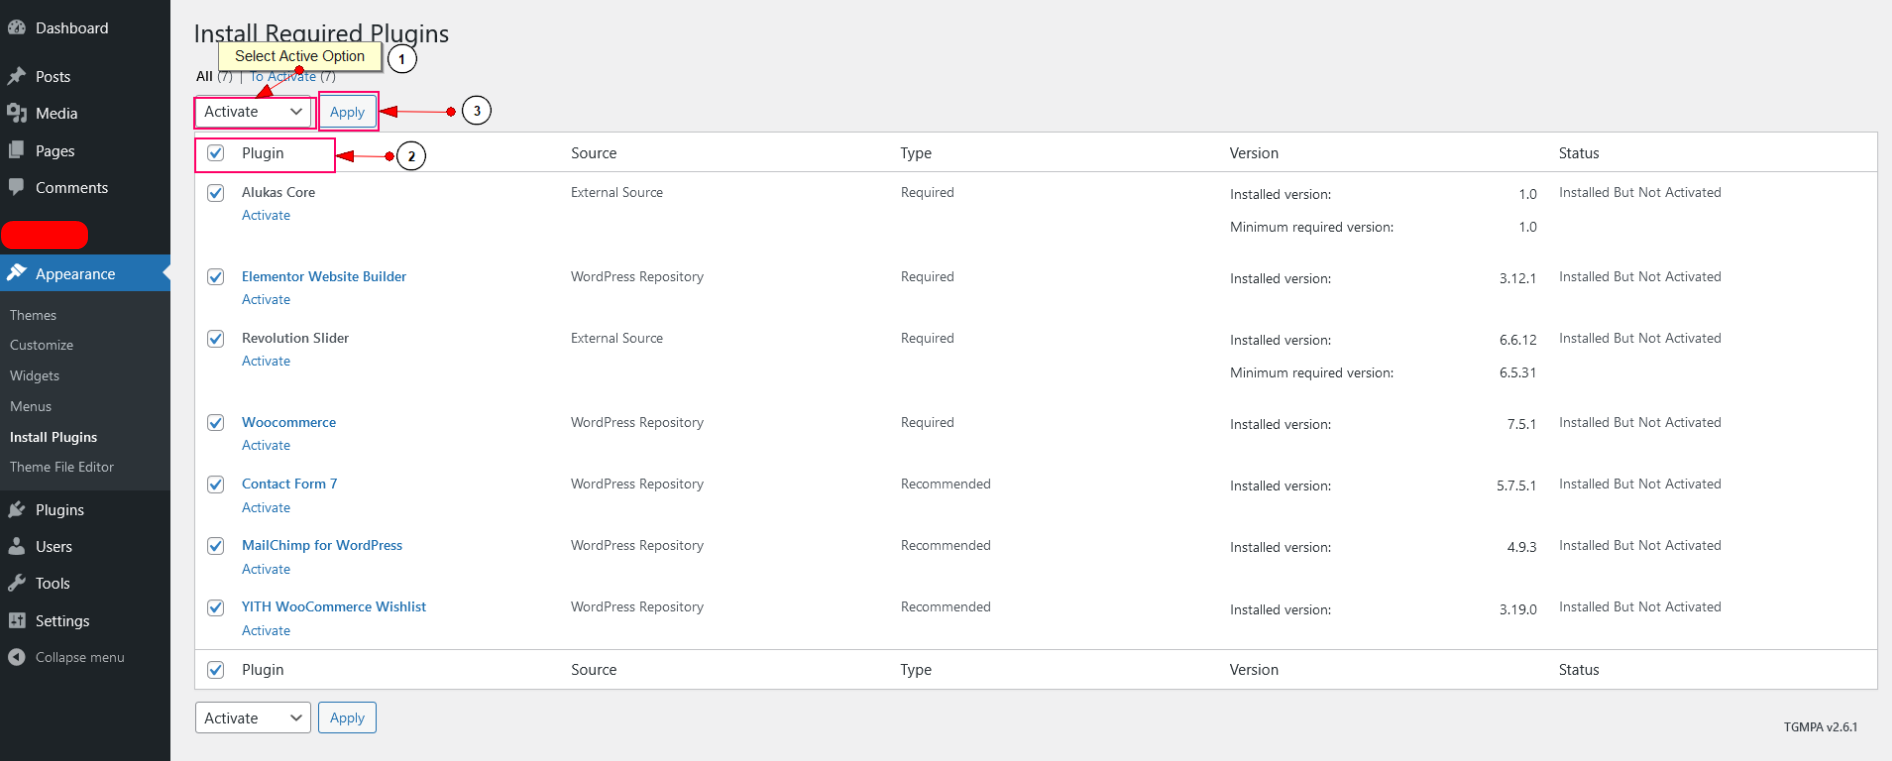
  5. Select all plugins again, change the Bulk Actions dropdown to Activate, and click Apply to activate the selected plugins.
    Install Plugins

Import Demo Content

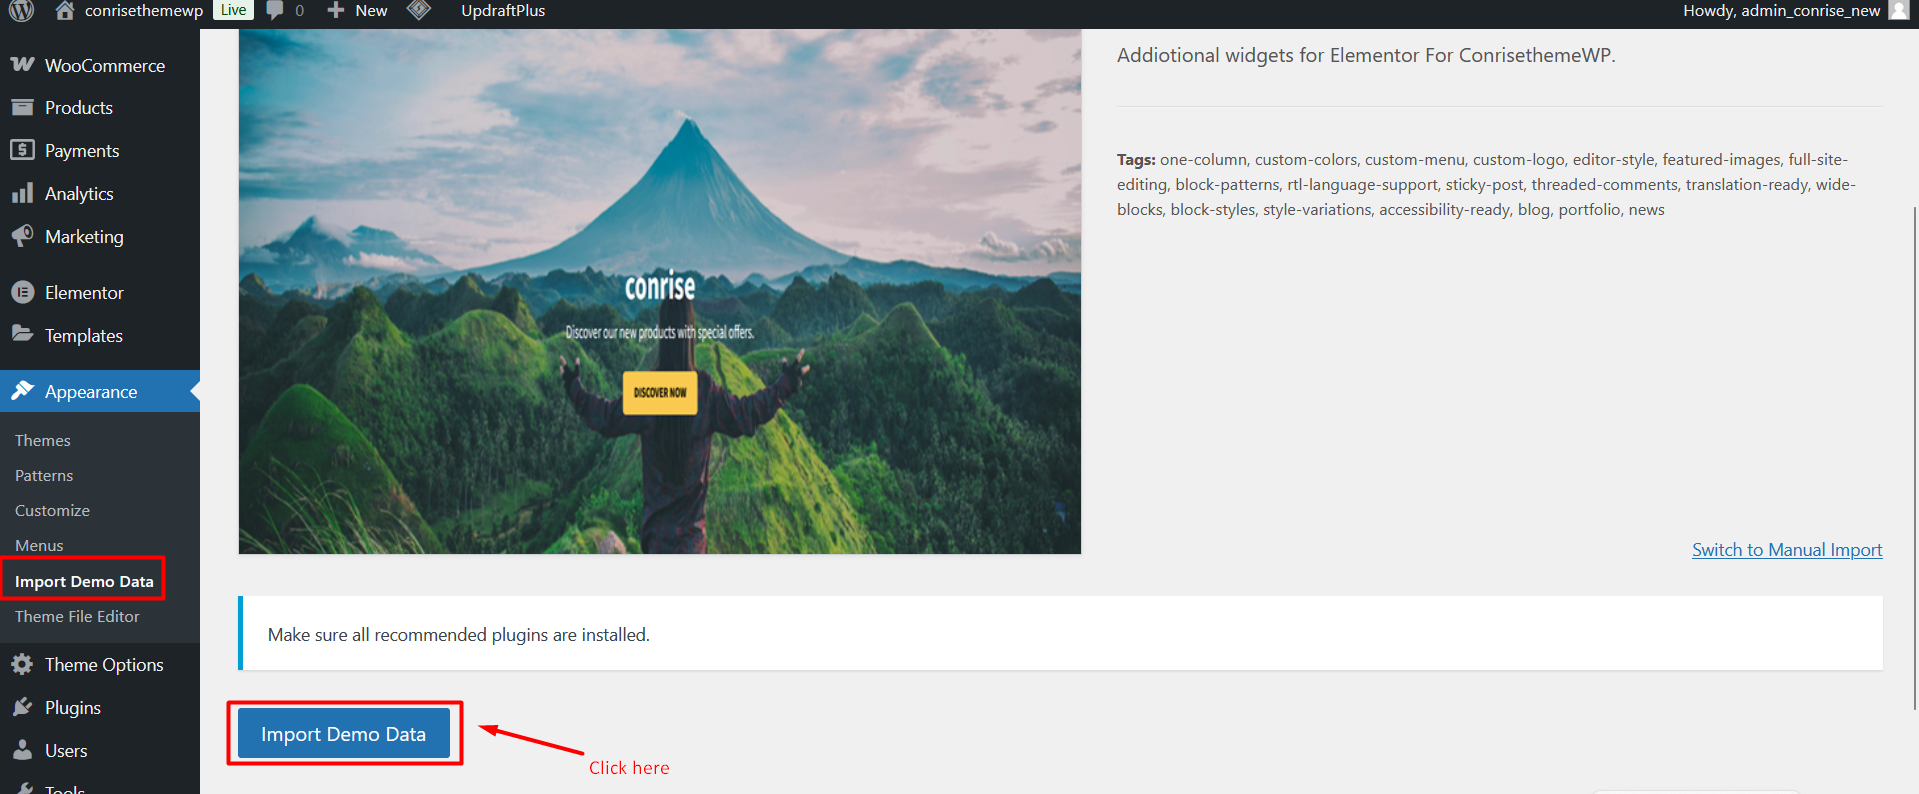
Import Pre-built Conrise Demos Easily

To quickly set up your site like the Conrise demo, you can import the demo content by following these steps:

  1. Login to your WordPress dashboard.
  2. Go to Appearance > Demo Import.
  3. Choose the demo you want to import and follow the on-screen instructions.
    Import Demo Content

Updating the Theme

Keep Your Conrise Theme Up to Date

If you're updating the Conrise theme, please follow the steps below. Updating is simple and your content will not be lost. However, any customizations made directly to core theme files (PHP, language files, etc.) will be lost. We recommend using a child theme for modifications and backing up translation files before updating.

1. Manual Update via WordPress
  1. Download the latest installable theme (conrise.zip) from ThemeForest.
  2. Login to your WordPress Dashboard.
  3. Navigate to Appearance > Themes.
  4. Click the Add New button, then Upload Theme.
  5. Choose the conrise.zip file and click Install Now.
  6. Click Replace current with uploaded after installation.
2. Manual Update via FTP
  1. Download the latest installable Conrise theme and unzip it on your computer.
  2. Connect to your server via FTP or SFTP.
  3. Navigate to wp-content/themes/.
  4. Delete the existing conrise theme folder.
  5. Upload the new unzipped conrise folder to the same location.

Speed Optimization

Improve Your Website Performance

To ensure the best performance of your website, follow these tips for optimizing speed and loading time.

What Can Make Your Site Slower?

  1. Plugins: Deactivate unnecessary plugins and test which ones may slow down your website.
  2. Images: Large images can drastically slow your site. Use optimized image sizes (e.g., 800x600 if your layout requires that size).
  3. Host: Slow hosting can cause low site speed. Consider checking your VPS configuration or contacting your shared hosting provider.
  4. JS and CSS Files: Use cache plugins to minify and combine these files, reducing server requests.

How To Improve Site Speed?

1. Image Optimization

Compress your images using tools like CompressJPEG or TinyPNG before uploading them.

2. .htaccess Code for Better Website Speed

If you're familiar with `.htaccess`, you can enhance performance by adding the following code to the root of your WordPress installation:


                                                    AddType application/x-font-woff .woff
                                                    AddType application/font-woff2 .woff2
                                                    AddType application/vnd.ms-fontobject .eot
                                                    
                                                    AddOutputFilterByType DEFLATE text/html
                                                    AddOutputFilterByType DEFLATE text/css
                                                    AddOutputFilterByType DEFLATE text/javascript
                                                    AddOutputFilterByType DEFLATE text/xml
                                                    AddOutputFilterByType DEFLATE text/plain
                                                    AddOutputFilterByType DEFLATE image/x-icon
                                                    AddOutputFilterByType DEFLATE image/svg+xml
                                                    AddOutputFilterByType DEFLATE application/rss+xml
                                                    AddOutputFilterByType DEFLATE application/javascript
                                                    AddOutputFilterByType DEFLATE application/x-javascript
                                                    AddOutputFilterByType DEFLATE application/xml
                                                    AddOutputFilterByType DEFLATE application/xhtml+xml
                                                    AddOutputFilterByType DEFLATE application/x-font
                                                    AddOutputFilterByType DEFLATE application/x-font-truetype
                                                    AddOutputFilterByType DEFLATE application/x-font-ttf
                                                    AddOutputFilterByType DEFLATE application/x-font-otf
                                                    AddOutputFilterByType DEFLATE application/x-font-opentype
                                                    AddOutputFilterByType DEFLATE application/x-font-woff
                                                    AddOutputFilterByType DEFLATE application/font-woff2
                                                    AddOutputFilterByType DEFLATE application/vnd.ms-fontobject
                                                    AddOutputFilterByType DEFLATE font/ttf
                                                    AddOutputFilterByType DEFLATE font/otf
                                                    AddOutputFilterByType DEFLATE font/opentype

                                                    # For Olders Browsers Which Can't Handle Compression
                                                    BrowserMatch ^Mozilla/4 gzip-only-text/html
                                                    BrowserMatch ^Mozilla/4\.0[678] no-gzip
                                                    BrowserMatch \bMSIE !no-gzip !gzip-only-text/html


                                                    mod_gzip_on Yes
                                                    mod_gzip_dechunk Yes
                                                    mod_gzip_item_include file \.(html?|txt|css|js|php|pl)$
                                                    mod_gzip_item_include mime ^application/x-javascript.*
                                                    mod_gzip_item_include mime ^text/.*
                                                    mod_gzip_item_exclude rspheader ^Content-Encoding:.*gzip.*
                                                    mod_gzip_item_exclude mime ^image/.* 
                                                    mod_gzip_item_include handler ^cgi-script$
                                                    

                                                    ## EXPIRES CACHING ##
                                                    
                                                    ExpiresActive On
                                                    ExpiresByType application/vnd.ms-fontobject "access plus 1 year"
                                                    ExpiresByType application/x-font-ttf "access plus 1 year"
                                                    ExpiresByType application/x-font-opentype "access plus 1 year"
                                                    ExpiresByType application/x-font-woff "access plus 1 year"
                                                    ExpiresByType application/font-woff2 "access plus 1 year"
                                                    ExpiresByType image/jpg "access plus 1 year"
                                                    ExpiresByType image/jpeg "access plus 1 year"
                                                    ExpiresByType image/gif "access plus 1 year"
                                                    ExpiresByType image/png "access plus 1 year"
                                                    ExpiresByType text/css "access plus 3 month"
                                                    ExpiresByType application/pdf "access plus 3 month"
                                                    ExpiresByType text/x-javascript "access plus 3 month"
                                                    ExpiresByType application/x-shockwave-flash "access plus 3 month"
                                                    ExpiresByType image/x-icon "access plus 1 year"
                                                    ExpiresDefault "access plus 3 month"
                                                    
                                                    ## EXPIRES CACHING ##
                                                    
                                                    Header set Connection keep-alive
                                                    
                                                    
                                                    # 3 Month
                                                    
                                                    Header set Cache-Control "max-age=7257600"
                                                    
                                                    # 1 Week
                                                    
                                                    Header set Cache-Control "max-age=604800"
                                                    
                                                    # 10 Minutes
                                                    
                                                    Header set Cache-Control "max-age=600"
                                                    
                                                    # NONE
                                                    
                                                    Header unset Cache-Control
                                                    Header unset Expires
                                                    Header unset Last-Modified
                                                    FileETag None
                                                    Header unset Pragma
                                                    	
                                                    
                                                    # END WordPress


Note: Do not overwrite existing .htaccess rules to avoid issues.

3. Recommended Plugins to Boost Site Performance
  • WP Rocket: Install and configure the plugin, then check your site's performance.
    Refer to the documentation for resolving slider issues with WP Rocket if needed.
    Speed Optimization Illustration
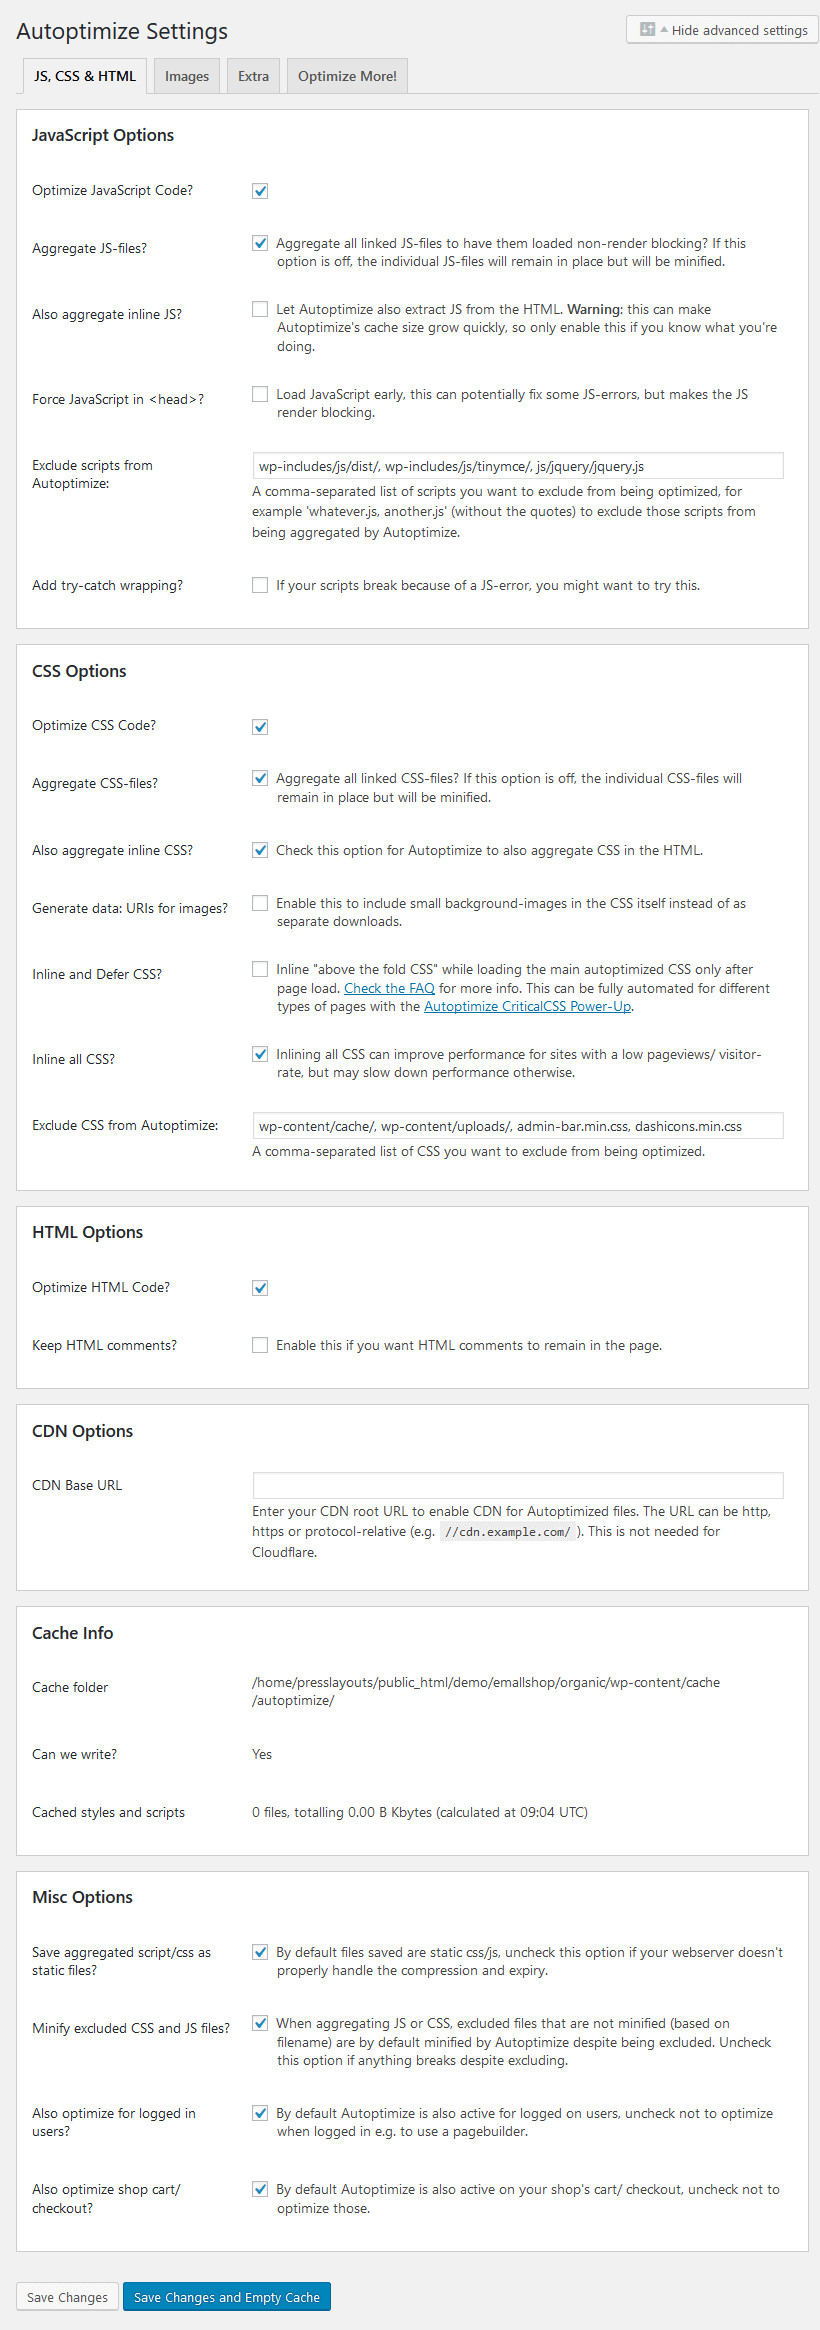
  • Autoptimize: Install and configure to optimize CSS/JS delivery.
    Speed Optimization Illustration
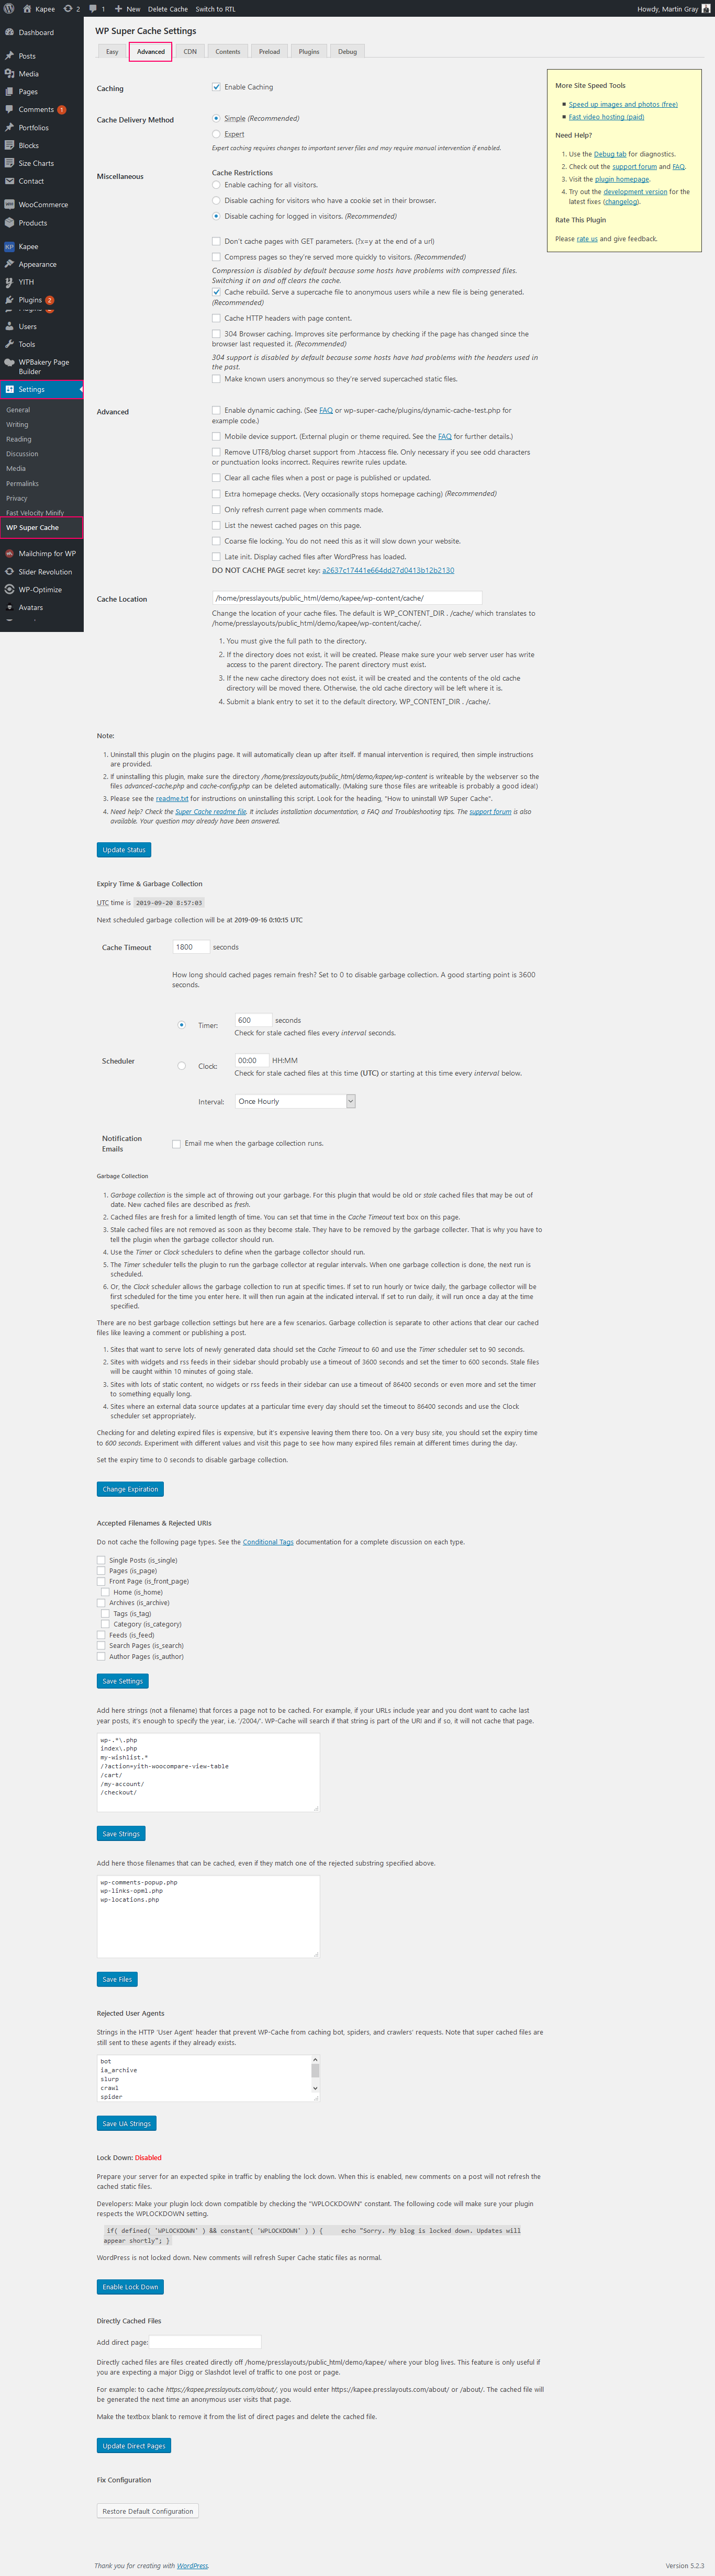
  • WP Super Cache: Enable caching and exclude WooCommerce pages like My Account, Cart, Checkout, Compare, Wishlist.
    Speed Optimization Illustration
    Speed Optimization Illustration

WooCommerce Configuration Guide

How to Set Up WooCommerce on Your WordPress Site

Thank you for choosing Conrise – Ecommerce WordPress Theme. Follow the steps below to configure WooCommerce properly.

Step-by-Step WooCommerce Setup:

  1. Install WooCommerce:

    Go to Plugins > Add New in your WordPress admin, search for "WooCommerce", install and activate it.

  2. Run the Setup Wizard:

    After activation, WooCommerce will launch a setup wizard. Follow the steps to configure:

    • Store details
    • Payment methods (e.g., PayPal, Stripe)
    • Shipping zones and costs
    • Recommended plugins

  3. Create Your Products:

    Go to Products > Add New to start adding your products with title, description, price, and image.

  4. Set Up Pages:

    WooCommerce automatically creates essential pages (Cart, Checkout, My Account, Shop). You can assign or customize these under WooCommerce > Settings > Advanced.

  5. Configure Currency and Tax:

    Go to WooCommerce > Settings > General to set your store’s currency and WooCommerce > Settings > Tax to enable and configure taxes.

  6. Email & Notifications:

    Manage email templates and notifications via WooCommerce > Settings > Emails.

After completing these steps, your WooCommerce store will be ready to sell!

WP Mail SMTP Configuration Guide

How to Set Up WP Mail SMTP Plugin

Thank you for choosing Conrise – Ecommerce WordPress Theme. Follow the steps below to properly configure the WP Mail SMTP plugin and ensure your emails are delivered reliably.

Step-by-Step WP Mail SMTP Setup:

  1. Install the Plugin:

    Go to Plugins > Add New, search for WP Mail SMTP, install and activate the plugin.

  2. Go to Settings:

    After activation, navigate to WP Mail SMTP > Settings in the WordPress dashboard.

  3. From Email & Name:

    Set the email address and name that should appear in your outgoing emails.

  4. Choose Mailer:

    Select the mailer service you want to use (e.g., SMTP, SendGrid, Mailgun, Gmail, etc.).

  5. Enter SMTP Details (if using SMTP):
    • SMTP Host (e.g., smtp.gmail.com)
    • SMTP Port (e.g., 587 or 465)
    • Encryption (SSL or TLS)
    • Authentication: ON
    • SMTP Username (your email)
    • SMTP Password (or App Password if using Gmail)
  6. Send a Test Email:

    Go to the Email Test tab in the plugin and send a test email to make sure everything works properly.

After completing these steps, your WordPress site will use your chosen mail service to send reliable emails.

How to Configure the Newsletter Plugin

Set Up WordPress Newsletter Plugin by Stefano Lissa

We would like to thank you for choosing Conrise – Ecommerce WordPress Theme. Here's how to set up the Newsletter plugin to collect subscribers and send newsletters.

Steps to Configure:

  1. Install the Plugin: Go to Plugins → Add New, search for Newsletter by Stefano Lissa, and click Install → Activate.
  2. Access the Plugin Dashboard: A new menu item Newsletter will appear in your WordPress admin panel.
  3. Configure Basic Settings: Go to Newsletter → Settings and:
    • Set sender email & name
    • Choose confirmation email options
    • Set your list preferences
  4. Create a Subscription Form: Go to Newsletter → Subscription Forms, create a form, and copy the shortcode.
  5. Display the Form on Your Site: Paste the shortcode into any post, page, or widget area to display the form.
  6. Create a Newsletter: Go to Newsletter → Newsletters and use the drag-and-drop editor to design and send emails.
  7. Check Statistics: View email opens, clicks, and subscriber growth in Newsletter → Reports.

Now you're ready to start collecting subscribers and sending newsletters directly from your WordPress dashboard!

Home Page Settings

Configure Your Homepage

Follow the instructions below to set up your homepage using Conrise - Ecommerce WordPress Theme.

Steps to Set the Homepage:

  1. Login to your WordPress admin panel (wp-admin).
  2. Navigate to Settings > Reading.
  3. Under Your homepage displays, select A static page.
  4. From the Homepage dropdown, select the page you want to use as your homepage (usually named “Home”).
  5. Click the Save Changes button at the bottom.

This ensures your website displays the correct front page and matches the demo layout of Conrise.

Create Page with Elementor

Using Elementor to Build Pages

Follow these steps to create and design custom pages using the Elementor page builder plugin:

Steps to Create a Page with Elementor:

  1. Login to your WordPress dashboard.
  2. Go to Pages > Add New.
  3. Enter a title for your page (e.g., "Home").
  4. On the right sidebar, under Page Attributes or Template, select Elementor Full Width (optional).
  5. Click on the Edit with Elementor button.
  6. Use the Elementor editor to drag and drop widgets and design your page as desired.
  7. Once done, click the Publish button to make your page live.

You can now assign this page as your homepage via Settings > Reading.

Create Page with Elementor Example

Elementor Settings

Configuring Elementor

Learn how to configure Elementor settings for optimal page building performance.

Elementor Settings

Enable Elementor page builder for specific post types:

  1. Go to Dashboard > Settings > Elementor
  2. Under the General tab, find the option to enable Elementor for specific post types.
  3. Check the post types you want Elementor to be enabled for.
  4. Click Save Changes.
Elementor Settings

Create Product Category

Add a Product Category

Organize your products by creating categories through the WooCommerce dashboard.

  1. Go to Dashboard > Products > Categories.
  2. Enter the Name of your category.
  3. Optionally, add a Slug (URL-friendly version of the name).
  4. Choose a Parent Category if it's a sub-category.
  5. Add a Description if needed.
  6. Upload a Category Image (optional).
  7. Click the Add New Category button to save.
Create Product Category

Create Product Attributes

Define Custom Attributes

Create product attributes like size, color, or material to be used in variable products.

  1. Go to Dashboard > Products > Attributes.
  2. Enter an Attribute Name (e.g., Size, Color).
  3. Add a Slug (optional).
  4. Choose if you want the attribute to be used for archives or variations.
  5. Click the Add attribute button.
  6. After creation, click Configure terms to add values (e.g., Small, Medium, Large).
Create Product Attributes

Create Products

Adding New Products

Learn how to add simple and variable products with images, descriptions, pricing, and more.

  1. Go to Dashboard > Products > Add New.
  2. Enter the Product Name and Description.
  3. Upload your Product Image and optionally add a Product Gallery.
  4. Select the Product Type from the dropdown:
    • Simple Product: Add a price under the General tab and update inventory if needed.
    • Variable Product:
      1. Go to the Attributes tab and select or create an attribute (e.g., Size, Color).
      2. Check Used for variations and click Save attributes.
      3. Go to the Variations tab, click Add variation or Create variations from all attributes.
      4. Set price, image, stock status, etc. for each variation.
  5. Fill in additional info like SKU, Inventory, Shipping, Linked Products, etc.
  6. Click the Publish button to make the product live.

Multicart /Single Cart System

Use Multicart with Elementor

Enable customers to add products from multiple vendors to their cart using Elementor widgets by following these steps:

  1. Go to Admin > Products and click to Edit any product.
  2. Click the Edit with Elementor button.
  3. Locate the Multicart settings dropdown in the widget panel.
  4. Select Yes from the dropdown if you want to enable the multicart feature for this product.
    Multicart System
  5. Select Variations from the dropdown of the variation tabs.
    Multicart System

Single Cart System

  1. Select No from the dropdown if you want to enable the single cart feature for this product.
    SingleCart System

Create Home Page

Create a Stunning Home Banner

Use Elementor's widgets to build an engaging homepage banner with background images or sliders by following these steps:

  1. Add a new page from the WordPress dashboard.
  2. Click Edit with Elementor from the page edit options.
    Home Banner
  3. In Elementor, search for the widget named 'Home Hero' and drag it onto the page.
    Home Banner
  4. Configure the options from the Content and Style tabs as needed.
  5. Once done, click on Save Changes or Update.

Home Widget Lists

Explore Homepage Widget Structure

Go to the Home page to see the widget layout used in sequence. These widgets structure your homepage effectively:

  1. Home Hero
    Home Hero Widget
  2. Home Heading
    Home Heading Widget
  3. Home Category
    Home Category Widget
  4. Home Cart
    Home Cart Widget
  5. Home Reviews
    Home Reviews Widget
  6. Home Popular Products
    Home Popular Products Widget
  7. Product Details Right Image
    Product Details Right Image Widget
  8. Bottom Description
    Bottom Description Widget

Create Product Details Page

Design a Product Details Page with Elementor

Follow these steps to design a beautiful and informative Product Details page using Elementor:

  1. Create a new product from the WordPress dashboard and give it a name like "Black Watch".
  2. Click Edit with Elementor on that page.
    Edit with Elementor
  3. Start adding the following widgets in order for a complete product detail layout:

Product Details Widget Structure

Widgets to Use on Product Details Page

Use the following Elementor widgets to construct the Product Details layout. Place them in this order for best results:

  1. Product Details Cart
    Product Title Widget
  2. Product Details Videos
    pro_det_videos
  3. Product Details LeftImg
    Product Price Widget
  4. Product Details LeftImg
    Add to Cart Widget
  5. Product Perfection
    Product Right Image Description
  6. Product Reason
    Product Reviews Widget
  7. Product Reason
    Product Reviews Widget
  8. Product Faq
    Bottom Description Widget
  9. Product Review
    Bottom Description Widget
  10. Bottom Description
    Bottom Description Widget

Create Category Page

Design a Category Page with Elementor

Follow these steps to design a dynamic and attractive Category Page using Elementor:

  1. Create a new page from the WordPress dashboard.
  2. Click on Edit with Elementor to launch the page builder.
    Create New Page
  3. Search for the desired Widgets (e.g., Category Banner, Heading, Breadcrumbs), drag them into your layout, and configure the settings.
    Search and Add Widgets
  4. To display products by category, use a Products or Loop Grid widget with query set to current category.
  5. Once everything is configured, click on Update or Publish to save the page.

Category Page Widget List

Display Products by Category

Below the banner, use Elementor’s widgets to show products filtered by the current category. Follow this widget structure:

  1. Home Hero
    home_hero Widget
  2. Product Category Items
    product_cat_items Widget
  3. Product Review
    pro_review Widget
  4. Bottom description
    bottom_description Widget

Create Checkout Page

Customize the Checkout Page with Elementor

Use Elementor to build a fully customized WooCommerce checkout page. You can include billing, shipping, payment methods, and order summary widgets to match your branding and UX preferences.

  1. Create a new page from the WordPress dashboard.
    Create New Page
  2. Click Edit with Elementor to open the page in Elementor editor.
  3. Search for the Checkout widget or related WooCommerce widgets like Billing, Shipping, and Payment, and drag them into your layout.
    Checkout Widget
  4. Configure the layout and styling options based on your brand and user experience needs.
  5. Click on Update to save the page.

After designing, assign the page as the default WooCommerce Checkout page by going to: WooCommerce → Settings → Advanced → Checkout Page.

Assign Checkout Page in WooCommerce

Thank You For Choosing Us